![]()
|
|
Extensions add extra functionality to PageStream. This section lists the extensions released by GrasshopperLLC.
TextFX |
Current version: 2
For PageStream 3.1 and newer
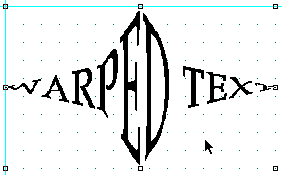
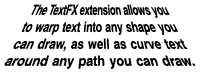
TextFX lets you warp text into shapes, as well as curve it around paths. Additionally, it lets you convert text to paths so that you can reshape it with PageStream's drawing tools. A quick look at the examples below will convince you that this extension is a must for anyone serious about DTP. TextFX can really make your titles grow out of the ordinary!


Using TextFX is extremely simple. Basically, you create a text block by typing directly on the page with the Text tool, then you select the text block and apply a TextFX shape or curve to it. PageStream will warp or curve the text accordingly.
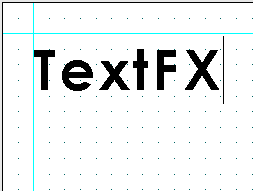
1. Create a text block.
Select the Text tool, click on the page and start typing to create a text block.
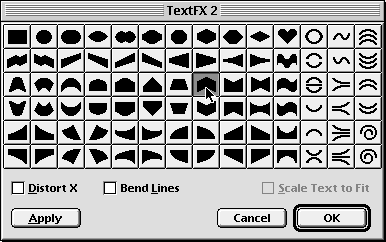
2. Select the shape or curve you want to apply to the text.
Select the Object tool and click on the text block to select it. After doing this, click on the FX button in the Edit Palette below the document window. (If the Edit palette is not currently visible, choose Show Edit Palette in the Window menu.)
The TextFX dialog box will appear. Choose the shape or curve that you want to apply to the text.
For extra quality, you can check the Bend Lines box, but this will require extra processing time.
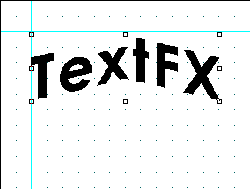
3. Click on OK to apply the selected shape to the text block.
For most of the curve icons located in the last three columns, you may only curve the text contained in the first line of the text blocks. If the text block contains more than one line, the extra lines will not be shown in the TextFX object. They will still be stored in memory, so if you change the TextFX object back to a regular text block, they will still be there.
Some curve icons require a text block of two or three lines. If the text block contains more lines than the required number, the extra lines will not be shown. Examples of such icons are shown below.
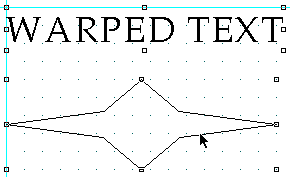
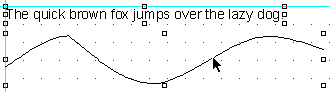
You can warp text inside any shape you can draw with PageStream's drawing tools. The instructions for doing this follow:
1. Select the text block and the shape.
2. Select the Warp Text script from the Scripts menu.
The text block will be warped inside the selected shape.
Note: In this screenshot, the new shape was doubled vertically to make the left and right edges clearer.
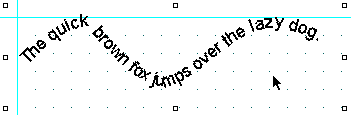
You can also curve text around any path you can draw with PageStream's drawing tools. Instructions for doing so follow:
1. Select the text block and the curve.
2. Select the Curve Text script from the Script menu.
The text will be curved around the path selected.
Note: In this screenshot, the new shape was resized larger to make it clearer. Try this with smooth curves for the best results.
With this extension installed, you will be able to convert text to paths. Paths can be moved and resized much faster than TextFX objects, but you will no longer be able to edit the text inside the text block, nor will you be able to apply another TextFX shape to it.
To convert a text block or TextFX object to a path: Select the text block or TextFX object and choose the Convert to Path command from the Object menu.
|
 |
1. Select the TextFX object with the Object tool.
2. Click on the FX button of the Edit palette.This will open the TextFX dialog box. (If the Edit palette is not currently visible, choose Show Edit Palette in the Window menu.)
3. Choose the Rectangle button (the first one of the first line) and click on OK.The TextFX object will be turned back to an editable text block once again. Note that this will not work if the TextFX object has been converted to paths.
For PageStream 3.1a, 3.2a or newer
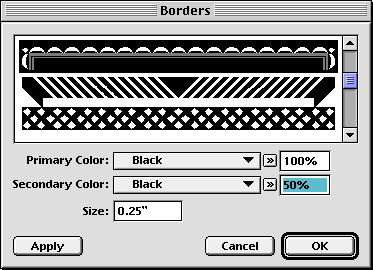
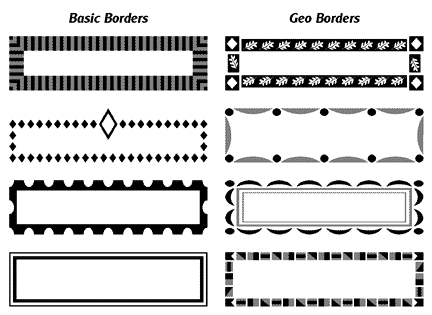
Borders are vectors illustrations designed to look good at any size. With this extension installed, you will be able to draw borders quickly around important parts of your documents. You can configure the border's design, width and colors. Two border collections are available at the time of writing: Basic and Geo Borders. Four samples of each collection are displayed below:
Drawing a border is very easy. In short, you select the Border tool from the toolbox, draw a border, and then modify the default border to your liking with either the Edit palette or the Borders dialog box.
1. Select the Border tool from the Toolbox.Create a border by dragging the mouse on the page. The coordinates will be visible in the Edit palette. When you release the mouse button, a border will be drawn, defaulting to the first border from the list of installed borders.
2. Choose the Object tool.If the Edit palette is not currently visible, choose Show Edit Palette in the Window menu. Click on the FX button in the Edit palette to display the Borders dialog box.
3. Select a border design.
From the scrolling samples of designs, choose one by clicking on it. The default size for that design will be filled in the size field. If you wish to change the size or thickness of the border, enter a new size. The border design and size may also be set directly from the Edit palette by using the Name and Size controls.
4. Select the border color(s).
Choose the primary color from the pop-up and assign a tint. If you wish to create or edit a color, click on the Browse button to the right of the pop-up. Some border designs include a second color and that color can be defined using the secondary pop-up and tint.
Note: The default secondary color is Black with a 50% tint and may need to be changed if you apply another color.
5. Click on Apply or OK.
The border will be redrawn on the page according to the options you selected in the Borders dialog box.
1. Close all open documents.
Select each open document and choose Close from the File menu.
2. Configure printer.
Choose Print Setup from the File menu and ensure that the printer is properly configured for Letter Paper sized Portrait printing.
3. Play the Print Borders script.
Choose Play External Script from the Scripts menu. Select PrintBorders.rexx (Amiga) or Print Borders (Macintosh) from the file selector. The script will print 6 labeled borders to a page.
When converting borders to paths using Convert to path, you will get just the box outline and not the complex border. Borders display in a manner that prevents them from being converted to a path. However, they take less memory and display faster than any path equivalent would.
The coupon borders contained in Volume 1 - Basic Borders include three additional versions of each for assembling a grid of coupons. Just draw a grid of borders with each common corner falling on the same coordinates. Assign to the upper left border the desired base design. All borders directly to the right should be of the A variation. All borders directly below should be of the B variation. All others should be of the C variation.
|
|